Quantcast
Channel: eternal-todo.com aggregator
Viewing all 12054 articles
Browse latest View live

Cisco Talos: DNSpionage brings out the Karkoff

$
0
0

Warren Mercer and Paul Rascagneres authored this post.

Update 4/24: The C2 section below now includes details around the XOR element of the C2 communication system.


Executive summary


In November 2018, Cisco Talos discovered an attack campaign, called DNSpionage, in which threat actors created a new remote administrative tool that supports HTTP and DNS communication with the attackers' command and control(C2). Since then, there have been several other public reports of additional DNSpionage attacks, and in January, the U.S. Department of Homeland Security issued an alert warning users about this threat activity.

In addition to increased reports of threat activity, we have also discovered new evidence that the threat actors behind the DNSpionage campaign continue to change their tactics, likely in an attempt to improve the efficacy of their operations. In February, we discovered some changes to the actors' tactics, techniques and procedures (TTPs), including the use of a new reconnaissance phase that selectively chooses which targets to infect with malware. In April 2019, we also discovered the actors using a new malware, which we are calling "Karkoff."

This post will cover the aforementioned DNSpionage updates, the discovery of the Karkoff malware and an analysis of the recent Oilrig malware toolset leak — and how it could be connected to these two attacks.


DNSpionage update

New infection document, same macro

In our previous post concerning DNSpionage, we showed that the malware author used malicious macros embedded in a Microsoft Word document. In the new sample from Lebanon identified at the end of February, the attacker used an Excel document with a similar macro:


Instead of using the .oracleServices directory, which we had previously observed, the attacker uses a .msdonedrive directory and renames the malware "taskwin32.exe." The scheduled task was also renamed to "onedrive updater v10.12.5."

Payload

Overview

This new sample is similar to the previous version disclosed in our previous post. The malware supports HTTP and DNS communication to the C2 server. The HTTP communication is hidden in the comments in the HTML code. This time, however, the C2 server mimics the GitHub platform instead of Wikipedia. While the DNS communication follows the same method we described in our previous article, the developer added some new features in this latest version and, this time, the actor removed the debug mode.

We also discovered that the actor added a reconnaissance phase, likely in response to the significant amount of interest in the campaign. This new phase, which is discussed in greater detail below, ensures that the payload is being dropped on specific targets rather than indiscriminately downloaded on every machine. This new tactic indicates an improved level of actor sophistication.

New reconnaissance phase

On the initial execution, the malware drops a Windows batch file (a.bat) in order to execute a WMI command and obtain all the running processes on the victim's machine:

  • wmic process list

The malware also identifies the username and computer name of the infected system. Finally, it uses the NetWkstaGetInfo() API with the level 100 to retrieve additional info on the system (this is the 64th number, hex 64 is 100 decimal).


This level returns information about the workstation environment, including platform-specific information, the name of the domain and the local computer, and information concerning the operating system. This information is key to helping the malware select the victims only and attempts to avoid researchers or sandboxes. Again, it shows the actor's improved abilities, as they now fingerprint the victim.

API and strings obfuscation

In this latest version, the developer split some strings into two parts. The actor attempts to use this technique to "hide" API call and internal strings. This would prevent static string analysis processes.

Below is an example of an API call split. It is in reverse order starting with "rNameA," followed by "GetUse," and the offset is also named incorrectly "aRnamea" and "aGetuse" (GetUserNameA()):


Below is an example of an internal string split (.\\Configure.txt):


This approach is not particularly sophisticated compared to what we usually observe. However, it is enough to break a Yara rule based on these strings. For example, the following rule would no longer alert due to a failed pattern match:

rule DNSpionage {
strings:
$conf="Configure.txt"
condition:
All of them
}


Let's check your anti-virus


The malware searches for two specific anti-virus platforms: Avira and Avast.


If one of these security products is installed on the system and identified during the reconnaissance phase, a specific flag will be set and some options from the configuration file will be ignored.

DNSpionage Excel maldoc

This new sample of DNSpionage has some oddities which we believe might be the actor's attempt to taunt or poke fun at the research community. We occasionally see this in cases where actors are disclosed by researchers or vendors. In DNSpionage, upon opening the Excel document, users are greeted with the insult, "haha you are donkey [sic]." The broken English suggests the actor is unlikely a native English speaker.


The domain used for the C2 is also bizarre. The previous version of DNSpionage attempted to use legitimate-looking domains in an attempt to remain undetected. However, this newer version uses the domain "coldfart[.]com," which would be easier to spot than other APT campaigns which generally try to blend in with traffic more suitable to enterprise environments. The domain was also hosted in the U.S., which is unusual for any espionage-style attack. This type of behavior will likely continue to distinguish this actor from more concerning campaigns like Sea Turtle, a separate DNS hijacking campaign we wrote about last week.

Along comes a Karkoff

Payload analysis

In April, Cisco Talos identified an undocumented malware developed in .NET. On the analyzed samples, the malware author left two different internal names in plain text: "DropperBackdoor" and "Karkoff." We decided to use the second name as the malware's moniker, as it is less generic. The malware is lightweight compared to other malware due to its small size and allows remote code execution from the C2 server. There is no obfuscation and the code can be easily disassembled. The malware is a Windows service named "MSExchangeClient:"


From an incident response point of view, it's interesting to note that the malware generates a log file: C:\\Windows\\Temp\\MSEx_log.txt. The executed commands are stored in this file (xored with 'M') with a timestamp. This log file can be easily used to create a timeline of the command execution which can be extremely useful when responding to this type of threat. With this in mind, an organisation compromised with this malware would have the opportunity to review the log file and identify the commands carried out against them.


C2 communication

The C2 servers are hardcoded in the analyzed samples:


The malware uses the domain or the IP address. Karkoff supports HTTP and HTTPS communications.

Karkoff uses base64 encoding to initially obfuscate the C2 communications. This is then further obfuscated by carrying out a XOR function, with a XOR key 70 (decimal).

This is derived from the “DropperBackdoor.constants” value “Constants.k__BackingField = 70;”.


The JSON .NET library is embedded in the malware. This library is used to handle messages from the C2 server. The answer is first decoded (base64) and the commands match the following pattern:

[{"ID": "123", "Data": "filename.exe|base64PEContent", "Type": "101"}, {"ID": "124", "Data": "filename.exe arg1 arg2", "Type": "102"}].

The command type 101 means that the data will be a base64 encoded file. The file will be stored with the filename placed before the pipe (filename.exe in our example). The command type 102 is the command line to be executed is stored in the data field.

Links between DNSpionage and Karkoff

We identified infrastructure overlaps in the DNSpionage and the Karkoff cases. One of the Karkoff C2 servers is rimrun[.]com. Here is the history of the IPs behind this domain:

  • 108.62.141[.]247 -> from 12/19/18 to 4/13/19
  • 209.141.38[.]71 -> on 12/26/18
  • 107.161.23[.]204 -> on 12/26/18
  • 192.161.187[.]200 -> on 12/26/18

The following IPs have links to our original DNSpionage blog post:

  • 107.161.23[.]204 was used by 0ffice360[.]com on 9/21/18
  • 209.141.38[.]71 was used by hr-wipro[.]com on 9/26/18
  • 192.161.187[.]200 was used by 0ffice360[.]com on 9/21/18

These dates also match the timeline of observed attacks during the DNSpionage campaign. Based on these overlaps in IP usage during the same time period, we have high confidence the same actor uses the Karkoff and DNSpionage samples.

Alleged Oilrig leak links

An alleged Oilrig leak appeared online on April 18. Information from the leak provides a weak link between Oilrig and the DNSpionage actors based on similar URL fields. While not definitive, it is an interesting data point to share with the research community.

The leak contains a webmask_dnspionage repository. This repository contains scripts used to perform man-in-the-middle attacks, but nothing about the DNSpionage or Karkoff C2 panels. However, the screenshots showed a URL that attracted our attention:


We identified the C2 panel as "Scarecrow," but we did not identify references to this panel in the leak. The victims in this screenshot are mainly from Lebanon, which is one of the areas targeted by DNSpionage and Karkoff. The URL provides some other relevant information:


The URL contains the /Th!swasP@NEl directory. After our first publication, LastLine published a blog post explaining that the actor made some mistakes in their Django configuration:


You can see the content of the PANEL_PATH variable of the DNSpionage C2 server: /Th!sIsP@NeL. The panel path of the leak and Django internal variables of the DNSpionage C2 server are very similar: /Th!swasP@NEl and /Th!sIsP@NeL. While this single panel path is not enough to draw firm conclusions, it is worth highlighting for the security research community as we all continue to investigate these events.

Conclusion

The threat actor's ongoing development of DNSpionage malware shows that the attacker continues to find new ways to avoid detection. The oddities we mentioned are certainly not normal, but the payload was clearly updated to attempt to remain more elusive. DNS tunneling is a popular method of exfiltration for some actors and recent examples of DNSpionage show that we must ensure DNS is monitored as closely as an organization's normal proxy or weblogs. DNS is essentially the phonebook of the internet, and when it is tampered with, it becomes difficult for anyone to discern whether what they are seeing online is legitimate. The discovery of Karkoff also shows the actor is pivoting and is increasingly attempting to avoid detection while remaining very focused on the Middle Eastern region. Cisco Talos will continue to monitor for activity from this actor and ensure our protection and detection capabilities continue to prevent such advanced attacks on our customers.

Coverage

Additional ways our customers can detect and block this threat are listed below.


Advanced Malware Protection (AMP) is ideally suited to prevent the execution of the malware used by these threat actors. Below is a screenshot showing how AMP can protect customers from this threat.


Cisco Cloud Web Security (CWS) orWeb Security Appliance (WSA) web scanning prevents access to malicious websites and detects malware used in these attacks.

Email Security can block malicious emails sent by threat actors as part of their campaign.

Network Security appliances such asNext-Generation Firewall (NGFW), Next-Generation Intrusion Prevention System (NGIPS), and Meraki MX can detect malicious activity associated with this threat.

AMP Threat Grid helps identify malicious binaries and build protection into all Cisco Security products.

Umbrella, our secure internet gateway (SIG), blocks users from connecting to malicious domains, IPs, and URLs, whether users are on or off the corporate network.

Open Source SNORTⓇ Subscriber Rule Set customers can stay up to date by downloading the latest rule pack available for purchase on Snort.org.

Indicators of Compromise (IOCs)


The following IOCs are associated to this campaign:

DNSpionage XLS document

2fa19292f353b4078a9bf398f8837d991e383c99e147727eaa6a03ce0259b3c5 (SHA256)

DNSpionage sample

e398dac59f604d42362ffe8a2947d4351a652516ebfb25ddf0838dd2c8523be8 (SHA256)

Karkoff samples

5b102bf4d997688268bab45336cead7cdf188eb0d6355764e53b4f62e1cdf30c
6a251ed6a2c6a0a2be11f2a945ec68c814d27e2b6ef445f4b2c7a779620baa11
b017b9fc2484ce0a5629ff1fed15bca9f62f942eafbb74da6a40f40337187b04
cd4b9d0f2d1c0468750855f0ed352c1ed6d4f512d66e0e44ce308688235295b5

C2 server

coldfart[.]com
rimrun[.]com
kuternull[.]com


Wired: Security: GoDaddy Takes Down 15,000 Spammy 'Snake Oil' Subdomains

$
0
0
You know those ads hawking bogus brain pills? Security researchers just helped take out a bunch of the spammers behind them.

Cisco Talos: JasperLoader Emerges, Targets Italy with Gootkit Banking Trojan

$
0
0
Nick Biasini and Edmund Brumaghin authored this blog post with contributions from Andrew Williams.

Introduction to JasperLoader


Malware loaders are playing an increasingly important role in malware distribution. They give adversaries the ability to gain an initial foothold on a system and are typically used to deliver various malware payloads following successful compromise. These attacks are popping up more frequently, as we covered in July with Smoke Loader and Brushaloader earlier this year. Loaders allow attackers to decide which malware to drop based on how they feel they can best monetize the access they gained. While malware loaders are commonly seen with email-based threats, they have also been prevalent within the exploit kit landscape for years. Recently, Cisco Talos observed an increase in loader activity being used to deliver various malware to systems located in various European countries.

Specifically, we're tracking a loader known as "JasperLoader," which has been increasingly active over the past few months and is currently being distributed via malicious spam campaigns primarily targeting central European countries with a particular focus on Germany and Italy. JasperLoader employs a multi-stage infection process that features several obfuscation techniques that make analysis more difficult. It appears that this loader was designed with resiliency and flexibility in mind, as evidenced in later stages of the infection process.

Over the past several months, we've seen several spam campaigns with signed emails attempting to infect victims with JasperLoader and ultimately the Gootkit banking trojan. Message signing makes use of certificates' verification to confirm the authenticity of the person sending the email, as only those with access to the private keys should be able to sign the message. Message signing is not the same as message encryption and is used only to validate the identity of the message sender not to guarantee the confidentiality of the message itself. Talos has identified several malicious campaigns making use of this type of message signing as a way to lend credibility to their messages and maximize the likelihood that potential victims will open the malicious attachments.

Malicious spam campaigns


As with many email-based threats, Talos observed multiple distinct campaigns being leveraged to distribute JasperLoader. Each campaign featured various email templates and downloader configurations. Each campaign was also relatively localized and featured multiple languages specific to each of the countries that were being targeted. Most of the campaign activity targeted European countries with a specific focus on Italy. However, we have identified campaigns targeting countries outside of Europe. Below is an example of an email associated with one of the campaigns targeting Germany.
Figure 1: Example email (German)

The email is fairly basic and includes an attached ZIP archive. The subject line "Zahlungserinnerung" roughly translates to "Payment Reminder," which is a theme consistent with many of the malspam campaigns commonly observed in the wild. This particular campaign leveraged a Visual Basic for Applications (VBS) script that was responsible for initiating the JasperLoader infection process. We'll dive into the obfuscated script later. The campaigns targeting Germany were some of the only ones that were observed using VBS files to initiate the JasperLoader infection. Most of the attacks generally used DOCM files to download JasperLoader, and ultimately Gootkit.

As previously mentioned, most of the JasperLoader campaign activity that has been observed over the past few months has been targeting Italy. As can be seen in the screenshot below, these emails are significantly different than those seen in the other campaigns. Rather than containing a malicious file attachment, these emails purport that they are notifications associated with the receipt of a "certified email" and contain an attached EML file.

The threat actors distributing JasperLoader are leveraging a legitimate certified email service called Posta Elettronica Certificata (PEC) to distribute these emails. This is a certified email service related to legislation recently passed in Italy involving new requirements associated with electronic invoicing that took effect at the beginning of 2019. This new legislation requires Italian businesses to use electronic invoicing to deliver invoices for both business-to-business (B2B) and business-to-consumer (B2C) transactions. Attackers have recognized that this is an attractive way to leverage an already trusted email service to maximize the likelihood that they can convince potential victims to open their malicious emails.
Figure 2: Example "Certified" email

One of the requirements associated with this new legislation is that all electronic invoicing emails must be signed and sent using a new platform called "Sistema di Interscambio (SDI)." Additionally, invoices should be sent using a specific XML-based format for consumption and that format should be verified and its validity confirmed before being transmitted to the recipient of the invoice.

As you can see, this particular campaign is leveraging this service, which allows them to transmit messages that meet the requirements associated with this new legislation and abuse the trust between potential victims and the certified email service.
Figure 3: Certificate details

The certificate itself is valid and associated with the PEC certified email service that was described above. Using the PEC certified email service, organizations are allowed to send attachments of up to 30MB to recipients. Posta Elettronica Certificata (PEC) is currently being widely used in Italy, Switzerland and Hong Kong and allows people to send registered email messages. The idea behind this project is to allow anyone — whether living in the country or not — to communicate through official channels, while allowing for the verification of the authenticity of the message sender. This service enables the communication of official business-related information without relying on physical mail services, facilitating faster real-time communications.
Figure 4: Certificate properties

The campaigns observed to be leveraging the PEC service contained emails that claim to be notifications of the receipt of a "certified email message" and featured EML attachments. The screenshot below shows what one of these EML attachments looks like when opened by potential victims.
Figure 5: Attached email message

As can be seen above, the attached EML files contain attached ZIP archives that hold Microsoft Word DOCM files that reference the same invoice as the emails to which they were attached. The DOCM files contain malicious embedded VBA macros that initiate the JasperLoader infection process. The metadata associated with the DOCM files used across many of the campaigns have been observed containing the string value "VPS2day" in several of the metadata fields.
Figure 6: ZIP attachment contents

Figure 7: Document properties

Talos identified multiple unique malicious DOCM files associated with JasperLoader campaigns taking place over the course of several weeks. An example search for files with metadata containing the string "VPS2day" resulted in 167 unique files in VirusTotal.
Figure 8: Metadata search results

In addition to the campaigns using malicious DOCM files to distribute JasperLoader, we also observed messages containing malicious JS downloaders. There were also some campaigns that featured legitimate and malicious file attachments. For example, some of the observed campaigns included ZIP files containing JS and XML files and benign PDF invoices. In several of the campaigns, some of the files were improperly named. For example, the XML files were .XM instead of .XML and the PDF invoices were .PF instead of .PDF.

Subtle changes like this can be surprisingly effective when attempting to convince potential victims to open file attachments. Talos also observed campaigns that leveraged PDF attachments that contained no file extension whatsoever. Investigating the PEC certified email service, we identified that this service is being widely abused by threat actors for a variety of malicious purposes dating back to the beginning of 2019 when the legislative requirements took effect.

One other interesting aspect of this campaign was its utilization of Domain Shadowing, a technique Cisco Talos discovered, which was pioneered by exploit kit users back in 2015. This technique allows the adversary to host malicious content on subdomains associated with legitimate domains. This is typically achieved through abuse of the registrant account, allowing for the creation of subdomains pointing to adversary-owned infrastructure.

JasperLoader details


Microsoft Word documents were attached to several of these malicious emails. When opened, these documents displayed this decoy image:
Figure 9: Example of a malicious Word document

The message displayed in the image is in Italian, and translates to:

This file was created with a prior Microsoft Office 365 version. To view the contents you need to click on the "Enable modifications" button, located on the yellow bar at the top, and then click on "Enable content."

JasperLoader Stage 1


The Microsoft Word documents contain malicious macros that execute JasperLoader and start the infection process. Using the Python oletools package, we can further analyze the macro execution and determine how the infection process takes place.
Figure 10: Analysis results using oletools

As displayed in the screenshot above, oletools detects the presence of the VBA macros embedded within the Word document. The macro is configured to execute when the Word document is opened and is responsible for executing the commands to initiate the infection. The presence of "Chr" within the VBA macros may indicate that the macros have been obfuscated, which we will walk through to provide an example of the process analysts can take to analyze these types of malware loaders.

In addition to the use of Microsoft Word documents, Talos also observed the use of ZIP archives that directly contain VBS downloaders. The infection process is the same in both cases. While the obfuscation differs slightly between the two types of campaigns, the approach is very similar. We will walk through the infection process using the VBS with the following hash (SHA256): dc78dbd42216fdb64c1e40c6f7a2fad92921f70c40446d62eb1873d6b77ee04c.

As previously reported by oletools, the macros have been obfuscated to make static analysis more difficult. The macros define a variable and then an array containing a large number of elements.
Figure 11: Obfuscated VBScript array

At the end of the script, the following code is responsible for performing a mathematical operation on all of the numbers in the array, reconstructing it into code that can be executed, and then executing it to continue the infection process:
Figure 12: VBScript array reconstruction

The value assigned to the variable d1 is 267. To identify what is actually going to be executed, we can subtract 267 from each of the numbers present in the array and convert the resulting value into the corresponding VBScript character using a conversion table similar to the one available here.

Once we have replaced the array values with the correct VBScript character value, we can see that the VBScript is responsible for executing PowerShell commands. However, there are still a lot of artifacts from the VBScript obfuscation present, which makes additional analysis difficult. Talos has observed that the value used for the subtraction changes frequently across samples, but that the logic remains the same.
Figure 13: Converted VBScript character values

The next step is to remove all of the unnecessary characters that were part of the VBScript obfuscation to recreate the VBScript, as well as the PowerShell associated with this stage of the infection. Once we have removed these extra characters, we are left with the following partially obfuscated code:
Figure 14: Partially obfuscated script

Several string values have been inserted into the PowerShell that the VBScript will execute in order to avoid string-based detection and make much of the PowerShell unreadable. A closer look at the portion of the PowerShell instructions that haven't been obfuscated show that during the execution process, -replace will be used to remove these extra string values to allow for the reconstruction of the obfuscated Powershell. Examples of this operation can be seen in the below syntax:

-replace '6ayBRVW',"";
-replace 'uVRWRut',"";
-replace '6xzQCRv',"";

This code instructs the system to replace these three string values throughout the script with nothing, effectively removing them and allowing the Powershell code to properly execute. Manually removing all references to these three strings results in the following:
Figure 15: Deobfuscated Stage 1 Powershell

This script performs the following operations:
  • Calls WScript and uses it to execute PowerShell.
  • PowerShell is used to invoke the Get-UICulture cmdlet to identify the language set used on the system.
  • If the language set is associated with one of the following countries, the infection process terminates:
    • Russia
    • Ukraine
    • Belarus
    • The People's Republic of China
  • Downloads additional data from the following URLs:
    • hxxp://cdn[.]zaczvk[.]pl/loadercrypt_823EF8A810513A4071485C36DDAD4CC3.php?vid=
    • hxxps://www[.]telekom[.]de/resources/images/130468/eSS-illustrations-V006-MeineErsteRechnung-FN-SG.png
    • hxxp://cloud[.]diminishedvaluecalifornia[.]com/501?dwgvhgc
  • The data downloaded from the aforementioned URLs is saved to the following file location, respectively:
    • %TEMP%\SearchIE32.js
    • %TEMP%\illustrations5543.png
    • %TEMP%\AdobeAR.exe
  • Executes the downloaded files, continuing the infection process.

The infection process then continues with the execution of the contents that were retrieved from the attacker's distribution servers.

JasperLoader Stage 2


As previously mentioned, the PowerShell executed in Stage 1 is responsible for reaching out to three distinct URLs used to retrieve and execute content on infected systems. The first URL that is defined is: hxxp://cloud[.]diminishedvaluecalifornia[.]com/501?dwgvhgc.

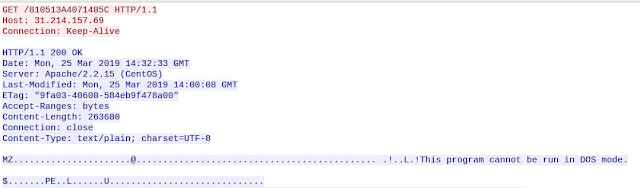
The malware loader initiates an HTTP GET request for contents hosted at the aforementioned URL and returns a numerical value from the attacker-controlled server. Note that the code is present within the Content Body of the HTTP Server Response:
Figure 16: Example HTTP GET request

As defined by the Powershell instructions in Stage 1, the returned content is then saved to %TEMP%\AdobeAR.exe.

In addition to the value "500" that is returned to the client, Talos has also observed additional codes being returned such as "404,""408," etc. In all of the cases Talos observed, the HTTP Response Code remains 200 OK, but the code present in the Content Body varies.

The malware loader also reaches out to the attacker's server at hxxp://cdn[.]zaczvk[.]pl/loadercrypt_823EF8A810513A4071485C36DDAD4CC3.php?vid=.

Following an HTTP GET request by the malware loader, the malicious server responds by sending back an HTTP response that contains obfuscated JavaScript:
Figure 17: Stage 2 obfuscated JavaScript

As defined in Stage 1, the contents of the returned JavaScript are saved to the %TEMP%\SearchIE32.js and executed. The contents have been obfuscated to make analysis more difficult. Similar to what was seen with the VBScript obfuscation in the previous stage of the infection, the code defines an array, and then uses push() to create the string of obfuscated data. JavaScript code at the end of the returned content is responsible for reassembling, deobfuscating, and then using eval() to execute the JavaScript.
Figure 18: JavaScript execution functionality

The good news with JavaScript obfuscation is that, typically, the code deobfuscates itself prior to execution. Rather than attempt to manually deobfuscate the JavaScript, we can rely on this behavior to have the code deobfuscate itself automatically. In order to more efficiently deobfuscate and analyze the malicious JavaScript, we can use an analysis tool like Malzilla.
Figure 19: Malzilla decoder tab

Malzilla will deobfuscate the JavaScript and display it in the lower pane. In the case of JasperLoader, this results in another script containing a partially obfuscated set of PowerShell instructions that defines how the malware will continue the infection process.
Figure 20: Malzilla output

The returned script is partially obfuscated using the same method we encountered previously. As we saw before, we simply need to remove the junk strings included throughout the script to fully deobfuscate it. Once those strings are removed, we are left with a script that looks similar to what we saw earlier, with a few changes included:
Figure 21: Stage 2 PowerShell deobfuscated

This script is responsible for performing the retrieval of the commands associated with the next stage of the infection process. It performs the following actions:
  • Calls WScript and uses it to execute PowerShell.
  • PowerShell is used to invoke the Get-UICulture cmdlet to identify the language set used on the system.
    • If the language set is associated with one of the following countries, the infection process terminates:
      • Russia
      • Ukraine
      • Belarus
      • The People's Republic of China
  • Downloads additional data from: hxxp://cdn[.]zaczvk[.]pl/crypt0DD1D2637FDB71097213D70B94E86930.php
    • Saves the downloaded contents to %TEMP%\SearchIE32.txt
    • Reads the contents of the downloaded file and performs a Regex based replacement to deobfuscate it.
    • Executes the deobfuscated code to continue the infection process.
In addition to retrieving the data required to continue the infection process, the script also implements a Sleep cmdlet for 180 seconds then attempts to retrieve the latest obfuscated JavaScript that is hosted at the same URL that was referenced in Stage 1.
Figure 22: Stage 2 — JavaScript retrieval

This JavaScript is then executed again. This is a mechanism that can be used to ensure that as the attackers modify the infection process, they can ensure that any previously infected systems automatically retrieve the modifications and are updated accordingly. This demonstrates an approach that ensures that this loader can be used repeatedly, potentially to deliver different malware payloads over time.

As previously mentioned, the malware makes an HTTP GET request to the following URL to obtain additional instructions from the attacker-controlled server: hxxp://cdn[.]zaczvk[.]pl/loadercrypt_823EF8A810513A4071485C36DDAD4CC3.php.
Figure 23: Stage 3 retrieval

The obfuscated data that is returned by the server is then saved to %TEMP%\SearchIE32.txt. The script then reads back the contents of this file and performs a regex replacement operation to deobfuscate it so that it can be executed:
Figure 24: Stage 3 deobfuscation instructions

In order to further analyze the infection process, we need to deobfuscate the contents that were retrieved by the PowerShell. One way is to manually perform the same operation as the PowerShell.

In the previous screenshot, the following line of PowerShell is responsible for deobfuscating the code that was previously retrieved and adding it to the end of a variable assignment, which is later executed:
Figure 25: Stage 3 deobfuscation regex

As the SearchIE32.txt file is read back in, the -replace statement is responsible for removing two of every three characters from the file to deobfuscate and reconstruct the PowerShell commands to be executed. The operation looks like this:

The obfuscated code contains a lot of junk code:

0zig7fs9(y4 7b(i6G7aet5tvf-giUdtIacC4zuxelactd7u6wr53ehy)26.izNejahgm71ewf ga-99mefau6twyctvhu6 6w'cxRf7Ua5|5aUuzAxi|4uBv6Yez|7eCd7N13'v3)66{v4 81eigxjyitct83;3e z4}e0

For every three characters present in the obfuscated code, the first two characters are removed and the remaining character is added to the end of the variable $jwihbyjzvhwwziwzadiuxat

For example, the string:
0zig7fs9(y4 7b(i6G7aet5tvf-giUdtIacC4zuxelactd7u6wr53ehy)26.izNejahgm71ewf ga-99mefau6twyctvhu6 6w'cxRf7Ua5|5aUuzAxi|4uBv6Yez|7eCd7N13'v3)66{v4 81eigxjyitct83;3e z4}e0 
Becomes the PowerShell command:
if( (Get-UICulture).Name -match 'RU|UA|BY|CN'){ exit; } 

In order to more efficiently deobfuscate the next stage of instructions, we will leverage the PowerShell ISE console to unpack the code for us. We can do this by copying the data retrieved from the server to our system and modifying the same PowerShell commands specified in the aforementioned script:
Figure 26: PowerShell ISE Input

Now that the variable $jwihbyjzvhwwziwzadiuxat contains the deobfuscated code, we can simply retrieve the current value stored in this variable:
Figure 27: Using PowerShell ISE to retrieve code

This causes the PowerShell ISE console to provide the deobfuscated commands that will be used for the next series of operations. We can now retrieve this information and continue our analysis.
Figure 28: PowerShell ISE Stage 3 output

JasperLoader Stage 3


Now that we have obtained the PowerShell responsible for the next stage of the infection process, we can begin to observe the main characteristics of the malware loader itself. Below is the Powershell code associated with this stage of operations.
Figure 29: Stage 3 deobfuscated PowerShell

As can be seen in the screenshot above, this is where the majority of the activity associated with JasperLoader takes place. The PowerShell present in this stage is responsible for the operations described in the following sections.

Geolocation checks


The PowerShell associated with Stage 3 of the JasperLoader infection process performs exactly the same geolocational verification that we have observed in all previous stages of the infection. It checks the UICulture of the system and terminates execution if the UICulture matches Russia, Ukraine, Belarus, or People's Republic of China.
Figure 30: Stage 3 geolocation check

Achieving persistence


The next series of actions are associated with maintaining access to the system. A function called CreateShortcut() is defined that is responsible for achieving persistence by creating a LNK shortcut in the Startup folder of the infected system to ensure that the malware will execute when the system reboots.
Figure 31: Stage 3 persistence mechanism

Bot ID generation


The malware also queries the system using WMI and retrieves various pieces of information that are used to generate a unique identifier for the infected system. This information is later transmitted to the C2 server to register the newly infected system and allow for it to be uniquely identified. These activities are performed by the CreateID() function that is defined, as shown below:
Figure 32: Stage 3 BotID generation

Bot registration and command retrieval


The infected system then uses an HTTP GET request to beacon out to the command and control (C2) server and transmits the unique bot identifier to register the new bot. It also waits for a response from the C2 server to determine how to proceed:
Figure 33: Stage 3 C2 registration

As can be seen in the observed screenshot, the C2 server issues HTTP responses that include pipe-delimited parameters that provide additional commands to JasperLoader and direct it how to proceed.

Supported commands:


JasperLoader currently has support for three distinct commands that may be received from the C2 server during this operation. They are denoted by the first character that is present in the response received from the C2 server. (Such as the letter "d" in the previous screenshot.)

Update mechanism ("u")


The "u" command may be received from the C2 server and directs JasperLoader to attempt to attempt to update itself using the parameters received from the C2 which are handled as values in an array assigned to the variable $action.
Figure 34: Stage 3 update mechanism

Bot management mechanism ("m")


The "m" command provides a mechanism with which the attacker can execute arbitrary system commands using Powershell on infected systems. The loader waits for a response from the C2 server that contains pipe-delimited information. It retrieves PowerShell commands from C2 and passes them to the Invoke-Expression (IEX) PowerShell cmdlet so that they can be executed.
Figure 35: Stage 3 bot management

Download mechanism ("d")


The "d" command directs the infected system to retrieve the final malware payload and provides the parameters with which this operation should take place. It informs JasperLoader where to go to retrieve the final malware payload, where to save it, and where to send status updates following successful deployment of the final payload.
Figure 36: Stage 3 download Function I

Figure 37: Stage 3 download Function II

It also creates a Windows Defender AV exclusion for the directory in which the PE32 will be stored if the system is running PowerShell version 4 or higher.
Figure 38: Stage 3 Windows defender exclusion

The system then attempts to retrieve the PE32 file that is the malicious payload in this particular infection. The screenshot below shows the C2 server delivering the malicious PE32 file to the infected system.
Figure 39: Stage 3 payload delivery

The status of the successful deployment of the malware payload is then further communicated to the attacker's server.
Figure 40: Post-infection status update

In this particular case, the malicious payload being delivered by JasperLoader is a widely distributed banking trojan called "Gootkit." This malware mainly looks to steal users' information and can act as a backdoor to the compromised machine.

Conclusion


JasperLoader is a malware loader that features a multi-stage infection process. This process has been constructed in a way that makes the loader resilient and provides flexibility to adversaries that are attempting to leverage it to spread malware. While it is currently being used to spread the Gootkit banking trojan, it will likely be used to distribute additional malware payloads in the future, as it has been designed in a way that allows the operators of the loader's infrastructure to use it for new payloads in the future as they choose to monetize their operation in different ways. The choice to abuse certified email services such as PEC demonstrates that as attackers are always looking for new ways to lend credibility to their social engineering attacks. In this case, abusing a legitimate email service allowed them to deliver their malicious emails in a way that would maximize the likelihood that a potential victim would open the attachments and infect themselves with JasperLoader. In addition to the various threats that we have already observed abusing these services, we expect additional threats to begin leveraging them as well.

Coverage


Additional ways our customers can detect and block this threat are listed below.

Advanced Malware Protection (AMP) is ideally suited to prevent the execution of the malware used by these threat actors.

Cisco Cloud Web Security (CWS) or Web Security Appliance (WSA) web scanning prevents access to malicious websites and detects malware used in these attacks.

Email Security can block malicious emails sent by threat actors as part of their campaign.

Network Security appliances such as Next-Generation Firewall (NGFW), Next-Generation Intrusion Prevention System (NGIPS), and Meraki MX can detect malicious activity associated with this threat.

AMP Threat Grid helps identify malicious binaries and build protection into all Cisco Security products.

Umbrella, our secure internet gateway (SIG), blocks users from connecting to malicious domains, IPs, and URLs, whether users are on or off the corporate network.

Additional protections with context to your specific environment and threat data are available from the Firepower Management Center.

Open Source Snort Subscriber Rule Set customers can stay up to date by downloading the latest rule pack available for purchase on Snort.org.


Indicators of compromise


The following IOCs are associated with various malware distribution campaigns that were observed during the analysis of JasperLoader activity.

Attachment hashes (SHA256)


A list of hashes observed to be associated with malicious email attachments can be found here.

Domains


A list of domains observed to be associated with JasperLoader can be found here.

IP addresses


A list of IP addresses observed to be associated with JasperLoader can be found here.

SANS Internet Storm Center, InfoCON: green: Unpatched Vulnerability Alert - WebLogic Zero Day, (Thu, Apr 25th)

$
0
0

The news today is full of a new deserialization vulnerability in Oracle WebLogic.  This affects all current versions of the product (the POC is against 10.3, but 12.x versions are also affected).  The vulnerability affects the wls9_async_response package (which is not included by default in all builds), so the workaround is to either ACL the Z/_async/* and /wls-wsat/* paths, or delete wls9_async_response.war.  A successful attack gets the attacker remote code exec on the vulnerable server.

The root cause here seems to be that the affected WAR components ingest and process all serialized data, and have a blacklist of "bad" content.  What this means to me is that we're likely to see a number of similar vulnerabilities / attacks crop up over the next while, until Oracle changes this approach.

Indications are that this is in the "tens of thousands" of affected sites, not hundreds or thousands or millions (not yet at least).

The vulnerability is posted as CNVD-2018-07811 (China National Vulnerability Database) at http://www.cnvd.org.cn/flaw/show/CNVD-2018-07811.  We don't have a CVE yet.

This bug was originally disclosed by the China Minsheng Banking Co.  There's a good write-up by the KnownSec 404 Team with  a bit more detail here: https://medium.com/@knownseczoomeye/knownsec-404-team-oracle-weblogic-deserialization-rce-vulnerability-0day-alert-90dd9a79ae93

This comes just one week after Oracle's "Patch Everything" Critical Patch Update (CPU) last week.  The next CPU isn't due for 3 months, so it'll be interesting to see what the out-of-band response patch or patches (if any) to this might be.

Stay tuned - we'll udpate this story as we get more information - in particular if we see attacks in the wild we'll post IoC's as we get them.

======= Update =======

Thanks to our reader who commented below!

The matching CVE number for this is CVE-2018-2628, which was identified as patched in last week's patches (Oracle's CPU - Critical Patch Updates).  However the POC mentioned was against a patched server, so I guess the patch isn't complete - nor can it be given Oracle's approach against this issue.

(c) SANS Internet Storm Center. https://isc.sans.edu Creative Commons Attribution-Noncommercial 3.0 United States License.

BreakingPoint Labs Blog: The Best Way To Optimize Load Balancing for Inline Security Appliances

$
0
0
In today’s 24x7, “always on” world, the company’s data network must be as reliable as possible.…

Un informático en el lado del mal: Hacking Windows 10: Más técnicas para saltarse AMSI (Anti Malware Scan Interface) con VBA y las Macros de Office

$
0
0
Hace unas semanas hablábamos sobre AMSI (Anti Malware Scan Interface) y el porqué de este mecanismo de protección que Microsoft liberó. El juego del gato y del ratón comentamos en su momento. Así parece seguir. AMSI puede ser aplicado a diferentes lenguajes de scripting, entre ellos el potente lenguaje de administración y pentesting: Powershell.

Figura 1: Hacking Windows 10: Más técnicas para saltarse AMSI
(Anti Malware Scan Interface) con VBA y las Macros de Office

Tal y como vimos hace unas semanas, había métodos clásicos y sencillos para jugar y conseguir el bypass de AMSI y otros métodos no tan sencillos, los cuales hablan de parchear el proceso para que el buffer de lectura siempre valga 0. Es un juego interesante y que dará que hablar, como en su día lo hizo el UAC o AppLocker. De este modo, la seguridad mejorará, ya que el encontrar caminos que hacen que una protección falle ayuda a mejorar su seguridad.

Figura 2: Libro de Hacking Windows: Ataques a sistemas y redes Microsoft

Hoy vamos a ver más técnicas de Hacking Windows que puedan ayudar en un proceso de pentesting, que puedan usarse para evadir AMSI cuando sea necesario. Hay que recordar que AMSI es una protección joven, la cual aparece en Windows 10. Es una característica de seguridad que actúa entre los intérpretes de scripting y el motor de antivirus.

AMSI en Windows

Los lenguajes de scripting que soportan AMSI son Powershell, Windows Script Host (wscript.exe y cscript.exe) y, recientemente, Visual Basic for Applications o VBA. El flujo es sencillo, cuando se ejecuta un comando en uno de estos intérpretes, los comandos son enviados a la interfaz de AMSI. Si el antivirus está ‘hookeado’, éste podrá recibir la ejecución y decidir si bloquear o permitir lo ejecutado. De este modo, se puede detectar ejecución en memoria de código malicioso y bloquear este comportamiento.

La idea del bypass es sencilla, intentar evitar que los comandos que son ejecutados a través del intérprete sean detectados como algo malicioso. Como ya comenté arriba, ya hemos visto ejemplos de bypass de AMSI en Powershell. En septiembre de 2018, Microsoft anunció la implementación de AMSI para VBA, incluyendo la característica para MS Office 365, release de enero de 2019. Hoy en día cualquier usuario de Office 365 debería ejecutar Office con AMSI habilitado para evitar las macros maliciosas.

Figura 3: AMSI en Macros VBA de Office

Según la teoría, cualquier método COM y llamadas a la API Win32 debería acabar siendo tratada por el sistema Behavior Log. Además, llamadas específicas son marcadas como triggers. La ejecución de una macro será pasada a AMSI para tomar una decisión. Por defecto, la configuración de AMSI no está habilitada para todas las macros de los documentos. Su política está configurada para documentos de baja confianza. Es decir, documentos cuya confianza es dudosa, ya sea por no estar firmado o por haber sido descargado de Internet.


Algunos bypasses de AMSI con VBA
Se han ido publicando algunos bypasses de AMSI para VBA. Algunos se han recopilado en un magnífico artículo de Pieter Ceelen, dónde se detalla el ámbito de ejecución de AMSI con VBA y los bypasses.

Bypass 1: Attack without VBA

El primer bypass es un ataque denominado ‘Attack without VBA’, por lo que parece que de primeras no tendremos a VBA. Está orientado al uso de macros: ‘Excel 4.0 macros’. En Excel hay un segundo motor de macros específico para Excel 4.0 macros. Este motor está implementado en Excel.exe y no utiliza el motor de VBA, el cual se encuentra en la DLL VBE7.dll.

Figura 4: Excel 4.0 Macro

Como el motor de AMSI solo ‘hookea’ a VBA, Excel 4.0 proporciona un vector de ataque. Sobre el ataque de Excel 4.0se puede leer más en un interesante artículo de Stan Hegt. El resumen es rápido y sencillo, la idea es crear una macro para MS Excel 4.0 Macro.

Figura 5: Ejemplo de Macro usando las API de Win32

Una vez realizada la macro y configurada con el Auto_open se tiene todo lo necesario. En el artículo de Stan Hegt se muestra un ejemplo básico para la apertura de la calculadora o cómo hacer uso de la API de Win32 y conseguir un ataque más completo y potente.

Bypass 2: Macro Runtime Scope & Abusing Trust

El segundo bypass que vamos a tratar es el denominado Macro Runtime Scope & Abusing Trust. ¿En qué consiste? Microsoft hizo varias excepciones sobre el scope o ámbito de ejecución de AMSI. Especialmente las excepciones para documentos categorizados como de confianza y ubicaciones de confianza.

Si pruebas con un documento de confianza y una macro verás que todo fluye normal pasando por AMSI, aunque quizá no debería. Esto es prueba y error. Por otro lado, el investigador Pieter Ceelen se dio cuenta que con los documentos de ubicaciones de confianza se excluían de AMSI en la configuración predeterminada.

Figura 6: PoC del Bypass 2 en GitHub

Se puede utilizar una PoC (Prueba de Concepto) desde el Github del investigador. La idea era sencilla: lo primero es que, con el documento abierto, se guarda el documento actual como una plantilla hacia la ubicación de confianza.

Después, se abre un nuevo archivo basado en esa plantilla que activará un evento document_new desde una ubicación confiable. El script que se proporciona en el Github tiene tres semanas, por lo que sigue siendo muy funcional.

Bypass 3: Innocent COM functions

El tercer bypass es denominado como ‘Innocent COM functions’. Microsoft hace distinción entre ‘InnocentCOM. Algunos ejemplos de funciones Innocent COM que permiten abusar de no lanzar AMSI son:
• Instanciación de Excel y llamar a ExecuteExcel4Macro o DDEInitialize. 
• Utilizar WMI y SpawnInstance.
Figura 7: Ejemplo por DarkOperator

Esto está documentado por Carlos Pérez o DarkOperator, genialmente, para que puedas probarlo con un paso a paso.

Bypass 4: Non-Win32API/COM functions that have side effects

El cuarto bypass es denominado ‘Non-Win32API/COM functions that have side effects’. Hay varias funciones integradas en Word y Excel que pueden proporcionar la ejecución de código o provocar el desactivar AMSI.

Es posible utilizar una macro para editar el contenido de un archivo de Word y almacenarlo como archivos de texto con extensión REG o BAT, por ejemplo, disableamsi.reg o disableamsi.bat. Con estos ficheros se puede deshabilitar AMSI a través de la configuración macroruntimescope en el hiveHKCU. Teniendo en cuenta, y esto es importante en el Ethical Hacking, que la mayoría de las empresas no van a configurar por GPO la configuración de macroruntimescope, se podrá sobrescribir en HKCU.

Figura 8: Macros para hacer estas pruebas

En el mismo archivo BAT se podrá hacer que se inicie Word sin el splash screen de bienvenida. Es un método interesante, y se puede hacer muy silencioso. Se puede descargar desde Github el código de la macro.

Conclusión

AMSI es una protección que está aquí para, en principio, estar en las nuevas generaciones de Microsoft Windows. Es una protección ambiciosa y que debe cubrir una serie de vectores de ataque muy amplios y complejos. Veremos cómo avanza el juego del gato y del ratón en los próximos meses que seguro que es divertido.

Autor:Pablo González Pérez (@pablogonzalezpe), escritor de los libros "Metasploit para Pentesters", "Hacking con Metasploit: Advanced Pentesting""Hacking Windows", "Ethical Hacking", "Got Root" y “Pentesting con Powershell”, Microsoft MVP en Seguridad y Security Researcher en el equipo de "Ideas Locas" de la unidad CDO de Telefónica.

Dancho Danchev's Blog - Mind Streams of Information Security Knowledge: Flashpoint Intel Official Web Site Serving Malware - An Analysis

$
0
0
UPDATE: Flashpoint Intel issued a response to my research. UPDATE: SCMagazine picked up the story. UPDATE: Anti-Malware.name picked up the story. UPDATE: EnterpriseTimes picked up the story UPDATE: Rambler News picked up the story. It appears that Flashpoint's official Web site is currently embedded with malware-serving malicious script potentially exposing its visitors to a multi-tude of

Wired: Security: The SIM Swap Fix That the US Isn't Using

$
0
0
While foreign phone carriers are sharing data to stop SIM swap fraud, US carriers are dragging feet.

Didier Stevens: Update: format-bytes.py Version 0.0.8

$
0
0

This new version of format-bytes.py (a tool to decompose structured binary data with format strings) brings a couple of new features.

Format strings can now be stored in libraries: you can store often used format strings (option -f) in text files and refer to them for using with format-bytes.py. A library file has the name of the program (format-bytes) and extension .library. Library files can be placed in the same directory as the program, and/or the current directory.
A library file is a text file. Each format string has a name and takes one line: name=formatstring.

Example:
eqn=<HIHIIIIIBBBBBBBBBB40sIIBB*:XXXXXXXXXXXXXXXXXXsXXXX

This defines format string eqn. It can be retrieved with option -f name=eqn.
This format string can be followed by annotations (use a space character to separate the format string and the annotations):

Example:
eqn=<HIHIIIIIBBBBBBBBBB40sIIBB*:XXXXXXXXXXXXXXXXXXsXXXX 1: size of EQNOLEFILEHDR 9: Start MTEF header 14: Full size record 15: Line record 16: Font record 19: Shellcode (fontname)

A line in a library file that starts with # is a comment and is ignored.

Format strings inside a library can be used with option -f. For example, to use format string eqn1, you use option -f name=eqn1. You prefix the format string name with “name=”, like in this example:

Option -s can also take value r now, to select the remainder: -s r. Like this:

The FILETIME format has been added. To use it explicitly, use representation format T.

And finally, with option -F (Find), you can search for values inside a binary file. For the moment, only integers can be searched. Start the option value with #i# followed by the decimal number to search for.

Example:

format-bytes_V0_0_8.zip (https)
MD5: 22F216C2304434A302B0904A9D4AF1FE
SHA256: A38D9B57DDB23543E2D462CD0AF51A4DCEDA1814CF9EAD315716D471EAACEF19

Un informático en el lado del mal: Criptografía Nazi en la II Guerra Mundial: La fantástica historia del Big Ben de Londres y los “Bletchley Park” alemanes

$
0
0
La historia de cómo se consiguió descifrar la máquina Enigma es de sobra conocida. Quizás el mejor libro que explica su funcionamiento y el proceso de “ingeniería inversa” que hicieron en Bletchley Park es “Hut Six”, escrito por Gordon Welchman, uno los genios olvidados que trabajó codo con codo junto al mismísimo Alan Turing. Nosotros hemos hablado en este artículo sobre "La Spanish Enigma" y en nuestro libro de Microhistorias que ya conocéis, tanto de Enigma como de Alan Turing. Así que tenemos ingentes cantidades de documentación (e incluso películas) sobre este hecho histórico que salvo millones de vidas.

Figura 1: Criptografía Nazi en la II Guerra Mundial: La fantástica historia
del Big Ben de Londres y los “Bletchley Park” alemanes

Pero ¿y los alemanes? ¿tenían un “Bletchley Park”? ¿cómo gestionaban ellos la seguridad de las comunicaciones? La Historia la escriben los vencedores, es por eso que algunos capítulos quedan en el olvido como es el caso de la historia de los criptoanalistas alemanes.

Figura 2: Libro Microhistorias donde hablamos de Enigma y Alan Turing

En el fantástico libro “Sapiens” de Yuval Noah Harari, aparece mencionado un hecho realmente interesante que nos sirve de muestra para destacar la increíble pericia e inteligencia de los científicos y militares alemanes. En la Europa ocupada, se emitían por radio las noticias de la BBC y al principio de dicha transmisión, se escuchaba en directo las campanadas del Big Ben dando las horas.

Figura 3: Fragmento de Sapiens en el que explica la anécdota.

Según el libro, los alemanes seguían al detalle dichas transmisiones hasta el punto que encontraron una forma de determinar las condiciones meteorológicas en función de las diferencias de tono de las campanadas, información que era vital para la Luftwaffe (Fuerza Aérea Alemana) y sus operaciones de bombardeo en territorio inglés. Es decir, un auténtico estudio de esteganografía y estegoanálisis para coger información por cover channels.

Figura 4: Foto del Big Ben durante la Segunda Guerra Mundial iluminado por los focos antiaéreos

No existen pruebas (al menos no las hemos encontrado) que confirmen este hecho, ya que medir estos valores tan complejos sólo partiendo del sonido (y con los medios de la época) era algo que se antoja bastante complicado. Pero, por otro lado, sí que era posible medir o, mejor dicho, comprobar, los sonidos de fondo. La lluvia, el viento o incluso sirenas y asociarlos a ciertos eventos meteorológicos es algo más plausible de detectar. Una cosa sí que es cierta: entre el 16 y el 18 de septiembre esta emisión en directo se cambió por una grabación.


Figura 5: Vídeo con el sonido del Big Ben tal y como sonaba por aquella época

Unas teorías dicen que se eliminó el directo justamente por lo que hemos comentado antes, es decir, porque todo un equipo de científicos nazis estaba escuchando y analizando hasta el último detalle dando demasiadas pistas, de cada sonido de aquella transmisión la cual venía directamente desde el mismísimo corazón del imperio británico: el centro de Londres.

Pero existe otra teoría quizás más ajustada a la realidad, y es que los británicos temían que los alemanes lanzaran un ataque con las bombas dirigidas V-1 justo en el momento de dicha transmisión y las explosiones se escucharan por todos los territorios ocupados, minando la poca moral que les quedaba. Como otro dato curioso y un poco dentro del mundo de la conspiración, el Big Ben nunca fue bombardeado por los nazis … ahí los dejamos ;)

Figura 6: Bomba volante V-1

Dejando de lado esta curiosidad, este hecho deja en evidencia una realidad: los alemanes también estaban vigilando, y de cerca, todas las transmisiones de radio de los Aliados. Estas transmisiones de la BBC estaban sin cifrar y eran públicas, pero la gran mayoría de las realizadas por los diferentes estamentos militares sí lo estaban, y estas también se escuchaban y analizaban. De hecho, los alemanes llevaban descifrando con éxito los mensajes de la armada británica desde 1930. Y cuando llegó la guerra en 1939, sabían perfectamente la ubicación de todos los barcos británicos. Estaban muy por delante de las fuerzas aliados y eso era gracias a su gran infraestructura de descifrado de comunicaciones.

Organismos de la Alemania Nazi dedicados a criptografía

Los responsables de este gran logro que otorgó una gran ventaja inicial en la guerra a los nazis se llamaban B-Dienst. Podríamos pensar, respondiendo a la pregunta que nos hacíamos al principio del post, que eran el “Bletchley Park” alemán. Pero no era exactamente así, B-Dienst no era más que un departamento dentro una organización mucho mayor a su vez parte del alto mando militar alemán (eso sí, fue uno de los que consiguieron los logros más destacados durante la guerra).

Figura 7: Técnico de la B-Dienst monitorizando señales de radio

De hecho, hay reconocidos hasta seis organismos (2 militares y dos civiles) dedicados a la criptografía durante la Segunda Guerra Mundial a servicio de la Alemania Nazi. Estos estaban integrados dentro de los altos mandos militares de la siguiente manera:
OKH/GdNA (dentro del Alto mando del Ejército): estaba ubicado en Jüterborg (al sur-oeste de Berlín) y estaba compuesto por 12.000 personas dedicadas a vigilar todas las señales de la armada aliada.
OKM/4SKL III (dentro del Alto mando Naval): monitorizaban todas las transmisiones y criptoanálisis del tráfico naval de los británicos, americanos, rusos, franceses y suecos. Se componía por un equipo de unos 2.500 entre técnicos, matemáticos e incluso soldados de campo (encargados de infiltrarse o acercase a las líneas enemigas para detectar transmisiones). La famosa B-Dienst que hemos comentado antes estaba dentro de este departamento militar.
OKL/LN (dentro del Alto mando Aéreo):como es lógico, la Luftwaffe era que quien recibía toda la información descifrada por este equipo de personas. Su lucha contra la RAF (Fuerza Aérea Real británica) y la USAAF (Fuerza Aérea Americana) provocó que este fuera el departamento que más ayudas y esfuerzo recibió durante la guerra, llegando a tener hasta 13.000 personas bajo su mando.
OKW/Chi (dentro del Comando Supremo de Fuerzas Armadas): este era un equipo de 800 personas dedicado sobre todo a estudiar todo el tráfico diplomático emitido por los aliados. Pero su característica más interesante es que eran un Red Team, ya que se encargaban de estudiar y encontrar errores dentro del cifrado alemán dentro del mismo departamento (OKW).
Y a estos cuatro anteriores hay que sumar los dos estamentos “civiles” (no eran militares de base, pero estaban controlados por el Partido Nazi). Estos eran:
Oficina Extranjera Sección de Criptonanalítica (Pers Z B): Unos 200 criptoanalistas formaban este equipo involucrado sobre todo a descifrar los códigos emitidos por diplomáticos. Tenían una pequeña estación de interceptación de mensajes en Dahlem pero la gran mayoría de mensajes los recibían también de OKW/Chi. También estudiaban el tráfico diplomático de los aliados, neutrales o amigos de la causa.
Despacho Goering de Investigación (FA): Agencia nazi creada en 1933 que monitorizaba cualquier transmisión (incluso no militar, además de cartas postales) en Alemania, Dinamarca, y la Polonia invadida. Luego se especializó en mensajes enviados por los rusos y estaba centrada en la BBC, por lo que posiblemente eran los que escucharon a fondo las campanadas del Big Ben.
Podemos observar el gran despliegue alemán para codificar y decodificar todo tipo de transmisiones. Además de la ventaja de esta gran infraestructura, para subir más aún su confianza en el control de las comunicaciones, se sumó la aparición la famosa e “invencible”, máquina Enigma. Pero a principios de 1942, las tornas comenzaron a cambiar. Todo el equipo de Bletchley Park junto a Alan Turing para cambiar el orden de volver del lado aliado el control de las comunicaciones, en la parte de la historia que ya conocemos.


Parece ser que no había buena relación entre los diferentes departamentos que antes hemos mencionado, sobre todo con la FA de Goering, lo que hizo que toda esa gran maquinaria de descifrado no funcionara a la perfección (cosa que sí hicieron bien los británicos al centralizar todos los esfuerzos en Bletchley Park). Las rencillas entre los diferentes mandos y la gran estructura dificultaron mucho esa comunicación. Además, cada vez hacía falta más gente en otro tipo de recursos bélicos y esa gran estructura fue disminuyendo con el tiempo.

Figura 9: Máquina Bombe diseñada por Alan Turing para descifrar Enigma/td>

Como hemos podido observar durante el artículo, los nazis con esa infraestructura mejor coordinada y gestionada hubieran echado por tierra posiblemente todos los esfuerzos de Bletchley Park. Incluso ellos detectaron los fallos en su flamante máquina Enigma y diseñaron diferentes “parches” de seguridad para evitarlos. Esto finalmente se plasmó en una máquina Enigma totalmente renovada, la SG-41 (Schüsselgerät), la cual llegó un poco tarde (finales de 1944) pero tiene el honor de ser la máquina Enigma que venció a Bletchley Park

Pero amigos/as … esa es otra (Micro-) historiapara más adelante;)

Otros referencias
- La “Spanish Enigma“, su aportación clave al descifrado final de Enigma y el rapapolvo de Bletchley Park
- Da Vinci Myth Code: Mensajes ocultos en las figuras de los Caballeros del Zodíaco resueltos con Enigma
- El enigma con Enigma
- Cifrado de las comunicaciones digitales: De la cifra clásica a RSA
Autores:

Fran Ramírez, (@cyberhadesblog) es investigador de seguridad y miembro del equipo de Ideas Locas en CDO en Telefónica, co-autor del libro "Microhistorias: Anécdotas y Curiosidades de la historia de la informática (y los hackers)", del libro "Docker: SecDevOps", Machine Learning aplicado a la Ciberseguridad” además del blog CyberHades.

Rafael Troncoso (@tuxotron) es Senior Software Engineer en SAP Concur, co-autor del libro "Microhistorias: Anécdotas y Curiosidades de la historia de la informática (y los hackers)", del libro "Docker: SecDevOps" además del blog CyberhHades.

SANS Internet Storm Center, InfoCON: green: Quick Tip for Dissecting CVE-2017-11882 Exploits, (Sat, Apr 27th)

$
0
0

In diary entry "Dissecting a CVE-2017-11882 Exploit" I analyze an equation editor exploit. These kind of exploits have become prevalent, I often see malware exploiting this vulnerability.

In my diary entry, I use my tool format-bytes.py to dissect the exploit using a long string of format specifiers. This is not practical if you have to do this often:

That's why I have now added a library of format strings to my tool format-bytes.py, eqn1 is the format string to use for this exploit:

So in stead of typing "-f "<HIHIIIIIBBBBBBBBBB40s..." ", you can now just type: "-f name=eqn1".


Didier Stevens
Senior handler
Microsoft MVP
blog.DidierStevens.comDidierStevensLabs.com

(c) SANS Internet Storm Center. https://isc.sans.edu Creative Commons Attribution-Noncommercial 3.0 United States License.

Wired: Security: Hackers Found a Freaky New Way to Kill Your Car

$
0
0
Mueller report fallout, a biometrics database, and more of the week's top security news.

...And you will know me by the trail of bits: Announcing the community-oriented osquery fork, osql

$
0
0

For months, Facebook has been heavily refactoring the entire osquery codebase, migrating osquery away from standard development tools like CMake and integrating it with Facebook’s internal tooling. Their intention was to improve code quality, implement additional tests, and move the project to a more modular architecture. In practice, the changes sacrificed support for a number of architectures, operating systems, and a variety of useful developer tools that integrate well only with the standard build system preferred by the open-source C++ community.

Worse still, the project’s new inward focus has greatly delayed the review of community contributions — effectively stalling development of features or fixes for the needs of the community — without a clear end in sight. Lacking a roadmap or predictable release cycle, user confidence in the project has fallen. Enterprises are postponing their planned osquery deployments and searching for alternative solutions.

Many of the most secure organizations in the world have already invested in making osquery the absolute best endpoint management solution for their needs. Being forced to look elsewhere would be a waste of their investment, and leave them relying on less effective alternatives. That is why we are announcing the community-oriented osquery fork: osql.

What are the goals of osql?

With osql, we are committed to restoring the community’s confidence in the osquery project, to making the development process more open and predictable, and to reviewing and accepting community contributions more quickly. Our goal is to restore direct community participation.

An open and transparent development process

In the immediate term, osql will be maintained as a “soft-fork.” We will closely track Facebook’s upstream updates without diverging from the codebase. Plenty of completed work is simply waiting upstream, in Pull Requests. We prepared a workflow through which the osql project can accept Pull Requests that the community deems stable enough to be shipped, but which have been ignored by the upstream maintainers. The community can pick and choose its priorities from those contributions, and incorporate them into the next release of osql.

Screen Shot 2019-04-18 at 8.56.40 AM

The osql organization on GitHub will be a hub for community projects

Continuous Integration, Continuous Delivery

We’ve also integrated a much-needed public CI using Azure Pipelines, which will build and run tests at each commit. Find the results here. The CI will help us build, test, and release faster and more frequently. We are committing to release a new osql binary (package installer) on a regular monthly cadence. We will communicate the changes that users can expect in the next release. They will know when to expect it, and that the version they download has passed all tests.

Screen Shot 2019-04-18 at 8.58.37 AM

Determine if the latest code is building for all platforms, at a glance

Restoring standard tool support for developers

We rewrote the build system from scratch to return it to CMake, the C++ community’s de-facto standard for building projects. This effort was non-trivial, but we believe it was central to preserving the project’s compatibility with open-source toolchains. The libraries and tools that represent the foundation of modern C++ development, such as Boost or the LLVM/Clang compiler toolchain, all support CMake natively. The most-used third party libraries use CMake as well, making it quite easy to include them in a CMake-based project.

Developers benefit from built-in CMake support in their IDEs. Visual Studio, VS Code, CLion and QtCreator can all easily open a project from its CMakeLists file, enabling a precise view of the project’s structure and the outputs of its build process. They’ll also regain the convenience of CMake-supporting static analyzer frameworks, like Clang’s scan-build, which helps discover critical bugs across an entire project.

By re-centering everything around a CMake build process, we made osql a more developer-friendly project than upstream osquery. If you would like to see for yourself and begin contributing to osql, check out the build guide.

VSCode

Work conveniently in the Visual Studio Code IDE, with CMake integration

What’s next for osql

Our work is just beginning! We plan to continue improving the automation of osql releases. Initially, osql releases will be unsigned binaries/packages. The next priority for the project is to implement a secure code-signing step into the CI procedure, so that every release is a binary signed by the “osql” organization.

The osquery project’s build process used to allow you to choose whether to download or to build third-party dependencies, thanks to easily modifiable Homebrew formulas. Not only that, you could also choose from where these dependencies were downloaded. That is no longer true for osquery currently, but we will restore that ability in osql (a task made easier thanks to CMake).

We also plan to extend the public CI for osql to enable it to test PRs opened against upstream osquery. This will help the community review those PRs, and provide a kind of quality assurance for their inclusion in a future release of osql.

In the longer term, thanks to CMake’s support for building on various platforms, it will be possible for osql to be built for whatever new systems that the community demands.

Want More? Let’s Talk

When we originally ported osquery to Windows, we didn’t imagine it would become so big, or that it would outgrow what Facebook alone could maintain. A whole community of organizations now deploy and depend on osquery. That’s why we’ve launched osql, the community-oriented osquery fork. If you are part of this community and are interested in porting to other platforms, need special features from the project, or want some customization done to the core, join our osquery/osql support group or contact us!

Fox-IT: Getting in the Zone: dumping Active Directory DNS using adidnsdump

$
0
0

Zone transfers are a classical way of performing reconnaissance in networks (or even from the internet). They require an insecurely configured DNS server that allows anonymous users to transfer all records and gather information about host in the network. What not many people know however is that if Active Directory integrated DNS is used, any user can query all the DNS records by default. This blog introduces a tool to do this and describes a method to do this even for records normal users don’t have read rights for.

Knowing where you are and where to go

Personally whenever I arrive at a new pentest or red team assignment I want to learn about the layout of the network, the software in use and where the interesting data is. If a company has non-descriptive server names or descriptions, tools like BloodHound or ldapdomaindump are not going to help much since SRV00001.company.local still doesn’t tell me what runs on this host. Running discovery tools like EyeWitness on a large range of IP addresses often returns a lot of default Apache/IIS pages, since most sites are configured to listen on a DNS name and not on the IP address. Knowing that gitlab.company.local also points to the same IP as SRV00001.company.local tells me that this is an interesting server if I’m after source code. Having access to DNS entries for AD is thus in my opinion quite valuable. Thus I wrote this small tool that can dump those records. You can either run it directly from a host within the network, or through a SOCKS tunnel using your favourite implant.

Prior work

This started when I was looking at Active Directory DNS, mostly inspired by Kevin Robertson’s work on ADIDNS. I tried to figure out how AD uses zones in LDAP for storing DNS records as I pulled up ADSI Edit and suddenly saw an overview of all the DNS records in the domain, using only a limited regular user. As I shared my surprise, Kevin pointed out to me that mubix already wrote about this back in 2013. So there was already a PowerShell script that could do this, but it didn’t do exactly what I wanted, so I decided to write a version in Python and add some options to enumerate more records than possible by default.

The “hidden” DNS records

The most obvious way to query for DNS records in LDAP would be to perform a query selecting all objects of the class dnsNode, which represent entries in the DNS zone. When I performed a query with the filter (objectClass=dnsNode), this returned quite limited results, even though I could see several more records when manually browsing to the DNS zone:

ADSI Edit of DNS zone

As visible on the image above, for several objects the objectClass is not visible. This is because of the default permissions on computer DNS records (and I think on other records not created via the AD DNS gui as well), which don’t allow all users to see the contents. Since the IP addresses are actually stored as a property of this object, it isn’t possible to view the IP address for these records either.

But like any user can create new DNS records by default, any user can also list the child objects of a DNS zone by default. So we know a records is there, we just can’t query it using LDAP.

DNS zone default permissions

Once we know a records exists by enumerating with LDAP, we can however query for it using DNS directly (since performing regular DNS queries doesn’t require privileges). This way we can resolve all records in the zone.

Querying records with adidnsdump

With adidnsdump, which you can get from my GitHub, it is possible to enumerate all records in the DNS zone. To get started, first display the zones in the domain where you are currently in with --print-zones. This will show which zones are present. Not all zones are interesting, for example forward, cache and stub zones don’t contain all the records for that domain. If you find these zones, it’s better to query the domain to which they actually belong. The output below shows that my test domain has only the default zones:

user@localhost:~/adidnsdump$ adidnsdump -u icorp\\testuser --print-zones icorp-dc.internal.corp
Password:
[-] Connecting to host...
[-] Binding to host
[+] Bind OK
[-] Found 2 domain DNS zones:
internal.corp
RootDNSServers
[-] Found 2 forest DNS zones:
..TrustAnchors
_msdcs.internal.corp

If we specify the zone to the tool (or leave it empty for the default zone), we will get a list of all the records. Records which can be listed but not read (so called “hidden” records) are shown but only with a question mark, as it is unknown which type of record is present and where it points to. The records are all saved to a file called records.csv.

listing the DNS records

To resolve the unknown records, specify the -r flag, which will perform an A query for all unknown records (you can easily change this to AAAA in the code if you’re in an IPv6 network). Several nodes which were blank before now suddenly have records:

listing and resolving DNS records

If you don’t have a direct connection but are working via an agent, you can proxy the tool through socks and perform the DNS queries over TCP with the --dns-tcp flag.

Mitigations

You shouldn’t really rely on secrecy of your DNS records for security. If you really want to hide this information, removing the “List contents” permission for “Everyone” and “Pre-Windows 2000 Compatible Access” does prevent regular users from querying the entries, but this does require disabling inheritance on the DNS zone and may break stuff, so I don’t really recommend going that way. Monitoring for high volumes of DNS queries or enabling auditing on DNS zone listings may be a better way to deal with this, by detecting instead of blocking this kind of activity.

The tools

adidnsdump is available on GitHub and on PyPI (pip install adidnsdump). Right now the tool only dumps records to CSV files, but feel free to submit requests for alternate formats.

This blog was originally published on dirkjanm.io

Didier Stevens: Update: jpegdump.py Version 0.0.7

$
0
0

This new version of jpegdump.py (a tool to analyze JPEG pictures) adds 2 new options: -t and -A.

Option -t: consider everything after the first EOI as trailing.

Option -A: perform ascii dump with RLE

jpegdump_V0_0_7.zip (https)
MD5: DF600AAADD1E6335CB1DC5FEF895B2AE
SHA256: 123CDBACA0533BE975751F935EA9C6CEF75B7F8E67CC0FBAD36F8C66DD9354D8


Un informático en el lado del mal: Adrenalyn XL: O cómo hago una colección de cromo-cartas de fútbol en el 2019 con Mi Hacker

$
0
0
Coleccionar cromos. Seguro que muchos habéis pasado por esta bonita actividad de entretenimiento que consiste en comprar sobres (o paquetes) de cromos y disfrutar de la bonita actividad social de cambiar los repetidos con otros niños y niñas. Una forma de desarrollar habilidades sociales en los más pequeños para hablar y negociar. Pero también de otras cosas, como la memoria, la especulación, la gestión de recursos económicos o la gestión de la frustración. Y es que hacer una colección de cromos, especialmente una como Adrenalyn XL es una autentica locura, que yo he automatizado durante los tres años en que la he hecho con Mi Hacker.

Figura 1: Adrenalyn XL: O cómo hago una colección de cromo-cartas
de fútbol en el 2019 con Mi Hacker

Supongo que si esperas hacer la colección de cromos sea algo como darle la paga a los niños y que se compren unos paquetes de cromos los fines de semana y cambien en el recreo del colegio y ellos la acaben, estás equivocado. Si esperas que ellos cambien los cromos y los últimos - los más difíciles - los puedas pedir por Internet, estás equivocado. Si esperas que puedas acabarla, yendo a centros especializados de segunda mano solamente, estás equivocado. Si esperas que sea algo barato, estás equivocado.

Hay que seguir muchos plazos para conseguir la colección completa, de forma muy disciplinada y hacerlo de la forma más eficiente en tiempo y recursos para lograr tener todos los cromos de cada uno de los años. Un obra de estrategia que exige una planificación temporal para resolver el problema gastando el menor número de recursos económicos y económicos.

Este artículo de hoy es sobre cómo yo organizo la tarea de coleccionar Adrenalyn XL con Mi Hacker, para conseguir nuestro objetivo: Terminar la colección de forma completa, en el menor tiempo posible y con el menor consumo de recursos. Así que, este post no es de tecnología, aunque mezcla algunas cosas que tienen que ver con el mundo del e-commerce, el fraude y la esteganografía, los scalpers, y los modelos de negocio digitales de hoy en día.

Adrenalyne XL 2018-2019

Antes de comenzar a explicar el proceso, quiero describiros en qué consiste la colección de Adrenalyn XL de Panini de la que voy a hablar, porque merece la pena entender de qué estamos hablando. Supongo que alguien podría pensar que se trata de una colección de cromos de fútbol al uso como era la popular Colección Este de La Liga (que ahora también es de Panini), pero no, esta no es así. Es una colección de cartas, o cromo-cartas, más cercano a las castas de Magik, de Pokemon, o de otras grandes franquicias que sacan un juego sobre los cromo-cartas.

Por un lado parece la típica colección de cromos de fútbol en la que salen de cada equipo un conjunto de futbolistas - 18 cromo-cartas de cada equipo en la primera fase -, más luego los Fichajes de última hora o los famosos "sustituye a", pero la verdad es que es mucho más. Estos son solo los 360 primeros cromos, y es una opción coleccionar solo estos con los niñ@s si no quieres gastar mucho dinero y quieres verlos cambiar.

Cada cromo-carta, tiene unos valores de - 4 números  en concreto - que son utilizados para definir sus características en ataque, defensa, control de juego, parada de penalties si es un portero, y la suma total. Además, tiene un ámbito de juego y una posición. Eso es porque hay un juego que se puede hacer en el mundo físico, o en el mundo online del que tienes las reglas en la web de Panini.

Figura 2: Estructura de los cromo-cartas para jugar con ellos

Si decides jugar en la web, debes registrar tus jugadores con un código único que va en cada carta por detrás. Es decir, cada uno de los cromo-cartas es único (cada uno tiene un ID Único) y debe registrarse en el juego online para poder utilizarlo en competiciones amistosas o campeonatos. 

Si esto ya lo diferencia con respecto a una colección de cromos tradicional, esta colección de cromos-carta tiene la característica de que un mismo jugador, por ejemplo Isco, aparece con diferentes numeraciones. Es decir, puedes tener a Isco en carta normal dentro del equipo del Real Madrid con una numeración, pero también lo puedes tener como SuperCrack o como Edición Limitada Premiun Oro.

Figura 3: Tes cromo-cartas de Isco con diferentes valores

En cada una de esas versiones, aparecen numeraciones distintas. Así que tenemos una pléyade de categorías en las que pueden aparecer los jugadores. Es decir, después de los 20 equipos por 18 cartas por equipo (que son 17 jugadores de la primera plantilla + 1 carta llamada "Duos imparables") suman un total de 360 cromo-cartas -, aparecen un montón de cromo-cartas que van desde el 361 al 469 de cromo-cartas "Bonitas" que tienen a los mismos jugadores pero con distintas numeraciones.

En esas cartas, también aparecen otros materiales de fabricación de los cromo-cartas, con cromados, relieves, dorados, etcétera, que las hacen más valiosas y que como vamos a ver tienen una importancia brutal a la hora de comprar los sobres porque se pueden usar técnicas de esteganografía para detectar en qué paquete están algunas de ellas. Y estas cartas son de la colección básica, pero especiales por tres motivos: Son más bonitas, tienen mejores numeraciones para el juego y, lógicamente, salen menos en los paquetes de cromos. 

Figura 4: Tres cromo-cartas de Supercracks

Son las que llamaremos "Bonitas", y tienen muchas categorías como: Ídolos, Guantes de Oro, Fuerza Cuatro, Superhéroes, Diamantes, VAR Boys o Supercracks. Para que digan que no es importante el marketing en el diseño de un producto. 

Las últimas de esas cartas son las más complicadas, porque son unas muy especiales para los Balones de Oro, donde salen 5 jugadores con los valores al máximo - es decir, que se supone que esos cinco jugadores pueden tener algún partido en modo Balón de Oro y estar a tope en todas las categorías - por lo que suman 100 en Ataque, Defensa y Control de Juego, con un total de 300 puntos. El máximo. 

Figura 5: Balones de Oro y Carta Invencible de este año

Además, se encuentran la Carta Campeón y la Carta Invencible. La Carta Invencible da 101 en cada categoría y la Carta Campeón mejora al equipo completo online. Y hasta aquí las cartas normales que se pueden conseguir en los sobres. Un total de 469 cromo-cartas. ¿Es eso todo? No, si consiguieras todas estas aún estás unas 125 cromo-cartas lejos del final de la colección. Todos los detalles de esta parte de la colección los tienes en la web de la colección bien explicados.

Más allá de los sobre de cromos: Productos Obligatorios

Si has pensado que con esto se acaba la colección. Estas lejos aún. Y primero debes conocer cómo funcionan las Ediciones Limitadas, que se consiguen comprando cosas más allá de los sobre normales de cromos - que para recordar, cuestan cada uno 1 € y lleva 6 cromo-cartas -. Hay que comprar lo que yo llamo "Productos Obligatorios" para completar la colección de cromo-cartas.

Figura 6: Tres de las Ediciones Limitadas que debes conseguir
comprando los "Productos Obligatorios"

1) MegaPack de Lanzamiento: Es el archivador, más la guía de la colección, más el campo de fútbol para jugar, más el libreto de lista de cromos, más 3 cromo-cartas de Edición Limitada. Si no compras este producto te quedas sin ellas. No es caro, son 8 € y es el gancho para comenzar la colección. Además vienen algunos sobres para empezar a tener cromo-cartas "Básicos" y "Bonitos".

2) Tin Box: Es una caja de metal, con 40 cromo-cartas de los que salen en los sobres -  que trae 3 cromo-cartas de Edición Limitada. Unos 12 € con los que debes contar si quieres tener los cromos de Edición Limitada que vienen en ella.

3) Sobres Premium: Esto es una "Colección Recursiva" en sí misma. Estos sobres de cromos cuestan 5 € - sí, cinco veces más que un sobre normal - y traen un sobre de dentro del sobre. Es decir, abres el sobre Premium y vienen unos cromos especiales que solo vienen en ellos y un sobre normal con cromos normales. Entre los cromos Premium se encuentran tres tipos de cromos que debes conocer, porque también hay truco.
-Ediciones Limitadas Premium: Son 6 cromos de Edición Limitada que solo salen en estos sobres Premium.
- Cartas Premium A, B y C: Son tres cartas especiales que dan acceso a una camiseta de fútbol de tu equipo. Es decir, que podrías enviarlas y conseguir la camiseta, pero te quedas sin los cromo-cartas para lucirlos en tu colección.
Figura 7: Cromo-Cartas Premium A, B y C
- Edición Limitadas Premium Firmadas:Esto es la requeterecursividad de la colección. De las 6 cartas de Edición Limitadas Premium que hay, existen tres que una de cada muchísimas veces, aparecen firmadas. En concreto, los cromo-cartas Edición Limitada Premium de Koke, Marcelo y Jordi Alba pueden aparecer firmadas en oro. Son las tres cartas más caras de toda la colección.
Hay que tener en cuenta que tal vez debas comprar 20 o 30 sobres Premium de 5 € cada uno y puede que te salga solo una de ellas firmada... o directamente ninguna. Así que la inversión que debes hacer para conseguir que te salga una firmada es muy alta.
4) Sobre Premium ORO:  Si pensabas que esto había acabado. Ni mucho menos. Hay un solo sobre. Solo uno y que es siempre el mismo, que trae 4 cromo-cartas especiales. Son 3 Ediciones Especial Premium Oro y la Online Card que sirve para mejorar mucho tu equipo en el juego Online. Recuerda que cada cromo-carta tiene un Id Único que la identifica en el back-end

Figura 8: Sobres Premium y sobre Premium Oro

5) Tres Revistas Jugón: Además de comprar todo la anterior, la revista Jugones que sale mensualmente, lleva 5 Ediciones Especiales para que la gente se la compre. Son revistas mensuales que se acaban pronto, así que hay que estar atento y en Febrero, Marzo y Abril comprarse esas tres revistas para tener las Ediciones Especiales completas.

6) Compact Box Platinum 10: Si creías que no se podían sacar más cromo-cartas, estabas equivocado. También se lanza una caja especial con 25 cromo-cartas que traen 10 Ediciones Plantinum 10 con diez jugadores que llevan 10 años en la liga. Y 15 cromo-cartas que son cromo-cartas BIS, es ecir, de los antiguos "Sustitutos" o "Nuevos Fichajes". Son 25 cromo-cartas que se consiguen con una caja extra.

Figura 9: Cuatro cromo-cartas de la Tin Box

7) Pack Mega Bonus Online: ¿Pensabas que ya estaba todo? Pues no, este año ha habido muchas sorpresas y ha aparecido el sobre Mega Bonus (5 € extra) por 4 cromo-cartas que valen para el juego online. Entre ellas Luis Suarez como MVP Evolution

Figura 10: Pack Megabonux online

Este sobre no estaba en la guía de la colección, así que digamos que ha sido una idea extra que han tenido los creadores del juego para que la gente ampliaran la funcionalidad en el juego online, al tiempo que ampliaban la colección de cromo-cartas. Pero aún queda mucho, que la colección se sigue ampliando según la comienzas.

Adrenalyn 2019 Plus: La extensión

La cosa aún se complica más, porque todos sabemos que aparece una extensión de cromo-cartas que todos los años aparece con el mercado de invierno, donde aparecen cromos numerados que van desde el número 470 al 520, es decir 51 números más junto con 38 cromo-cartas llamadas BIS, es decir, el equivalente a los famosos "Coloca en lugar de" o "Sustituye a"  o "Coloca en el mismo lugar qué". La lista completa de Adrenalyn 2019 Plus la tienes en este archivo. Entre ellas, un Balón de Oro de Messi firmado en dorado.

Figura 11: Adrenalyn Plus con Solari como entrenador del Real Madrid

Esto cromos salen en los sobres normales, pero en los sobres que se fabricaron y se pusieron a la venta después de que se cerrara el mercado de invierno, así que tienes que tener cuidado de no comprar sobres de cajas que tengan solo de la lista básica de cromos, lo que hace que nunca aparezcan estos cromos en ellos.

Pero este año pasó algo interesante, y es que hubo un cambio de última hora de entrenadores, uno de ellos muy famoso, como es el caso de Zinedine Zidane por el Real Madrid. Esto hizo que en tu colección de Adrenalyn 2019 Plus no lo tuvieras, así que han decidido meter una actualización de los cuatro entrenadores que se han cambiado después de su extensión. Y lo han hecho añadiendo otro elemento que debes adquirir por separado. Así que añade:

8) Revista Jugón 148: Con esta no contabas al principio de la colección, pero si quieres conseguir los 4 entrenadores BIS actualizados, son 4 € más que debes añadir al lote para terminar la colección completa.

Objetivo: Colección Completa

Si has llegado hasta este punto, habrás podido percibir lo complicado que es hacer una colección de cromo-cartas como ésta hoy en día, y lo bien que está organizado el producto para que los costes sean altos. Si has echado las cuentas, el coste mínimo que te puede valer hacer una colección como esta son unos 350 € si quieres obtener los 618 cromo-cartas que tiene, más los 4 sets de instrucciones - que vienen en los sobres y no es difícil conseguir -. 

Pero puede salir mucho más caro si juegas a la lotería de "abrir los sobres y confiar en el azar o la suerte". No es mi estilo. El coste mínimo que tienes que tener en cuenta, es que debes comprar lo siguientes elementos, a los que llamamos "Productos Oligatorios". Son lo que son. Si haces la colección y la quieres completa, no lo pienses. Debes reservar todos en tu quiosco o comprarlos online lo antes posible.
  • Megapack de lanzamiento.
  • Tin Box.
  • Compact Box Platinum 10.
  • Sobre Premium Oro.
  • Revistas Jugón 145, 146, 147 y 148.
  • Sobre Mega Bonus Oline.
Todo esto cuesta unos 65 € con los que debes contar, pero te faltan todos los cromo-cartas"Básicos", todos los cromo-cartas"Bonitos" y las extensiones de Adrenalyn Plus, así que necesitas una estrategia para gastar tu dinero en Sobres Básicos, Sobres Premium y Sobres Básicos con Adrenalyn Plus. Y ahí está la magia de ajustar el presupuesto.

Estrategias de compra de Sobres

A mí personalmente me gusta guardar los diferentes diseños de los sobres, que son cuatro modelos diferentes, así que siempre compro unos sobres al principio (como unos 10) para que conservarlos y que Mi Hacker consiga algunos repetidos, pero no muchos, así que invierto como unos 10 € en Sobres Básicos, más los cromo-cartas básicos que van a salir en la compra de los "Productos Obligatorios". Esto hace que consigas algunos cromo-cartas básicos (del 1 al 469) que irán completando el album, más algunos repetidos.

Elegir el sobre concreto a comprar puede ser una obra de ingeniería, porque tu proveedor de sobres - el quiosquero de toda la vida, puede ser tu amigo, neutro o tu enemigo. Como ya he dicho, los cromo-cartas "Bonitos" son diseños más complejos, con dorados, relieves, etcétera, lo que hacen que el cromo pese más. Si el quiosquero es hábil y conoce el truco, puede haber pesado los sobres antes para hacer un ataque de estegoanálisis con un side-chanel basado en peso del sobre y darte aquellos en los que haya más posibilidades de que salgan los cromo-cartass más caros (Balón de Oro y SuperCracks) o darte los que tengan menos posibilidades de aparecer. En este vídeo tienes una explicación.


Figura 12: Pesando sobres para encontrar el Balón de Oro

La compra de sobres continúa con los Sobres Premium, que son muy caros (5 € cada unidad) por lo que ahí no suelo invertir mucho. Necesitas 6 Ediciones Especiales más 3 Cartas Premium A, B y C, más las complicadas Ediciones Especiales Firmadas, con lo que son 12 cromo-cartas a conseguir en esos paquetes. Lo habitual es que salgan dos de esas en cada paquete, pero que te salgan las 12 comprando solo 6 Sobres Premium es casi imposibles. 

Yo suelo comprar solo 5Sobres Premium para tener 10 de esas cromo-cartas Premium, con lo que se consiguen unas 6 de las 12 (nunca me han salido las firmadas), y unas  4 cromo-cartas Premium repetidas, mas algunos cromo-cartas básicos y bonitos más (que faltan o que generan repetidos).

Llegado a este punto, el estado de la colección, si has comprado todos los Productos Obligatorios, y has comprado 10 Sobres Básicos y 5 Sobres Premium, es que tienes todas las Ediciones Especiales, todos los cromos Edición Especial Premium Oro, todos los cromos Edición Platinium 10, los cromos del MegaBonus y algunos cromo-cartas Básicos y Bonitos de los equipos y de numeración hasta el 469 conseguidos. Y por supuesto algunos repetidos.

Es el momento de hacer la lista para saber cuántos nos faltan del 1 al 469 y cuántos tenemos repetidos, porque ahora toca cambiar cromos para que desaparezcan todos los repetidos. Un objetivo es que no nos quedemos con cromo-cartas repetidos. No los necesitamos.

Así que, hacemos la lista, clasificamos los repetidos por categorías (Básicos, Bonitos de tipo Guantes de Oro, SuperCrack, Var Boys, etc...), y lo mismo para los repetidos de Edición Limitada de Sobres Premium que nos faltan (dejando los firmados a parte que son el unicornio de la colección) y vamos al RastrodeMadrid a cambiar cromo-cartas en la Plaza de Cascorro hasta que se nos acaban todos los repetidos (que suelen ser solo unos 20 o 30 cromo-cartas repetidas nada más).

Una vez cambiados, ya nos quedan cromo-cartas del 1 al 469 que conseguir de todos los tipos y hay que tomar una decisión para conseguirlos. Las opciones son:
- Comprar más sobres: Es jugar a la lotería, y pueden salir mucho más caros, y que tengas que invertir mucho más tiempo en volver a cambiarlos. Mi experiencia es que a Mi Hacker, con cambiar los primeros repetidos ya le vale, así que esto es una mala opción para invertir recursos económicos y tiempo. No entra en mis planes.
- Compra online a Panini:Con Panini puedes ir y comprar cromos en la web, pero solo te deja comprar un número limitado de cromos por categoría, así que puedes decidir comprar los que puedas con una única cuenta y luego decidir cómo conseguir el resto.
Por supuesto, puedes hacer un ataque de un Scalper, y conseguir los otros hciendo el hack más sencillo, que es sacarte varias cuentas a nombre de abuelos, abuelas, tíos y demás familiares para que puedas pedir todos los que te faltan. Con eso comprarías todos del 1 al 469 desde casa.
- Compra de Segunda Mano: Mucha gente vende sus cromos en webs de segunda mano o coleccionables, pero también en tiendas en el rastro. Si haces una compra a uno de los que los venden en el rastro y pides los cromos básicos del 1 al 360 (los más normales) del tirón, te pueden salir todos los que te falten por unos 20 o 30 €. Los que te falten el 360 al 469 pueden salir por unos 30 € o 40 €. Todo esto depende de cuántos hayan salido en los sobres y cuántos hayas cambiado.
Llegado aquí,  como te habrás dado cuenta, no has terminado la colección. Faltan la extensión de Adrenalyn Plus y los tres "Unicornios". Las tres cromo-cartas de Edición Limitada Premium Firmadas en Oro.


Como ya habrás visto, hacer la colección son muchos meses, y a los niños se les suele hacer largo, además de generar frustración porque no salen los cromo-cartas que quieren, así que yo intento que Mi Hacker no se enganche a la "adrenalina" de los juegos de azar, por lo que los cromo-cartas de Edición Limitada Premium Firmados Oro los compro en webs de segunda mano o en puestos del Rastro de Madrid. Al final, son tres puñeteros cromos que te van a costar entre 20 € y 40 € cada uno dependiendo de cuándo lo quieras comprar (al principio o al final).

Y queda la extensión de Adrenalyn XL Plus, que es difícil conseguir en el mercado de segunda mano, porque la gente está haciéndola. Sin embargo, si dejas que pasen un par de semanas desde que se lanza, los que se dedican a la venta de cromos en los puestos del Rastro de Madrid suelen hacer paquetes con todos a precios muy asequibles de 25 €, lo que ahorra mucho tiempo y dinero. Pero si quieres volver a jugar a la lotería con tu hij@, puedes hacer otra estrategia. A Mi Hacker, con cambiar en el principio ya tiene bastante, así que esto lo hacemos para completar el final.

Conclusión

Si alguien piensa que una colección como esta de Adrenalyn XL 2019 está pensada para que la acaben niños cambiando cromo-cartas en la calle, está equivocada. Yo la tengo acabada y tengo cero cromo-cartas repetidos, y sí, si has echado cuentas, hacerla completa sale como unos 300 o 400 € en total, depende de la suerte y las negociaciones que hagas, pero desde luego no es barata.

Figura 14: Nuestra colección Adrenalyn XL 2018-2019 acabada

Yo soy como soy, así que cuando empiezo algo lo termino, y cuando Mi Hacker me dice de hacerla, lo que realmente me da miedo de estas colecciones tan complicadas para  "niñ@s" es que se generen tres consecuencias que no me gustan.:
1) Adicción al juego de azar:Abrir los sobres con la esperanza de "salvación" para que venga un cromo-carta imposible como el Balón de Oro es algo que no quiero. No quiero que piense que el "azar" dicta su futuro. Así que nunca hay problema, tenemos un plan para acabar la colección que no depende el azar desde el principio.
2) Frustración por no acabarla: No es una opción. No hay problema, la vamos a acabar. Tenemos un plan para ello, solo vamos a ejecutarlo de la mejor forma para ahorrar tiempo y dinero. Básicamente es:
  • Paso 1: Compramos todos los Productos Obligatorios.
  • Paso 2: Comprarmos 10 Sobres Básicos y 5 Sobres Premium
  • Paso 3: Hacemos lista de cromo-cartas Básicas y Bonitas que nos faltan.
  • Paso 4: Cambiamos todos los repetidos con otros niñ@as.
  • Paso 5: Compramos cromo-cartas Básicas y Bonitas en Web de Panini que falten.
  • Paso 5: Compramos en segunda mano: Adrenalyn Plus y Cromos Firmados.
3) Indolencia:No quiero que piense que no terminarla es una opción. Si se comienza algo, hay que terminarlo. No vale desarrollar un "no pasa nada" por no terminarla. Es difícil, sí, pero tenemos un plan. Y Mi Hacker sabe que si empezamos algo, lo acabamos.
Por otro lado, hacer esta colección es una pasada porque también sacamos muchas cosas de aprendizaje. Me gusta que al hacer esta colección se desarrollan otras muchas cosas que me gustan, como son:
1) Investigación y planificación:Como habéis visto, saber cómo hacer la colección implica saber cuáles son los productos que hay que adquirir, cuándo, dónde y qué tenemos de cada uno de ellos. Para eso hay que investigar en la web, conocerse la guía, organizar acciones en el quiosco, en la compra online y en la compra en el rastro, y lo hacemos juntos.
2) Negociación y socialización:Como al final hay que cambiar cromos con otros niños y niñas, además de comprar cromos de segunda mano o en los puestos del rastro, obliga a que tenga que hablar, negociar, hacer listas, etcétera.
3) Trabajo en equipo y confianza:Como os podéis imaginar, trabajamos en equipo, pasamos tiempo juntos, y además compartimos el objetivo con normalidad. Tenemos la sensación clara de que cada nueva colección (ya hemos hecho Adrenalyn tres años, más varias de Frozen juntos) que vayamos a comenzar vamos a terminarla completa, solo hay que planificar cómo, por lo que Mi Hacker confía en que lo vamos a hacer.
Y esto es todo, un artículo que muestra cómo organizo con Mi Hacker un trabajo en equipo que podría ser otro distinto como hacer un juego en Scratch o una manualidad - que le encantan -. Cada uno decide cómo quiere gestionar estas cosas, yo os comparto cómo lo hago yo y por qué, por si a alguno le viene bien el día de mañana.

Saludos Malignos!

Un informático en el lado del mal: TIDoS Framework: Un proyecto para auditar webs desde la consola de comandos

$
0
0
Las aplicaciones web son suculentos objetivos para los cibercriminales que quieren entrar en tu empresa o en tu negocio, por ello cuando diseñemos y desarrollemos cualquier aplicativo web debemos tener la seguridad en mente en cada momento de su ciclo de vida. Una tarea muy importante es pasar las pertinentes pruebas de seguridad a todos los niveles que lleva la creación, puesta en marcha y mantenimiento de un servicio web.

Figura 1: TIDoS Framework: Un proyecto para auditar webs desde la consola de comandos

Como sabéis, el diseño de una aplicación debe estar en la fase de creación e implementación, como vimos en el artículo de "SecDevOps: Una explicación en cinco minutos" y llevar a cabo nuestro querido y necesario proceso de Ethical Hacking constantemente sacando el máximo partido de las técnicas de Hacking Web Technologies , ya sean Server-Side como son las vulnerabilidades de SQL Injection en aplicaciones web o los ataques Client-Side como XSS, CSRF, ClickJacking y similares.

Figura 2: Libro de Hacking Web Technologies escrito por Chema Alonso,
Pablo González, Ricardo Martín, Enrique Rando y Amador Aparicio

Para hacer esta segunda parte, es decir, para hacer las pruebas de Ethical Hacking, existen numerosas herramientas que nos ayudan en la tarea. De ellas hemos hablado y seguiremos hablando de muchos, pero hoy quiero hablar de TIDoS, que es un framework menos conocido.

Figura 3: TiDoS framework en GitHub

La herramienta se usa a través de una interfaz de texto intuitiva, en este framework se agrupan distintas funcionalidades destinadas a probar nuestras aplicaciones webs, además cuenta con módulos para hacer recolección información, tanto de manera pasiva, como activa.

Preparando nuestro equipo para usar TIDoS

Lo primero, antes de empezar a probar sus funciones, es instalar las dependencias y descargar la herramienta. Para trabajar aquí se hará uso de una versión de Kali Linux, tan útil para el pentesting, como siempre. Ejecutamos el siguiente comando:
sudo apt install libncurses5 libxml2 nmap tcpdump libexiv2-dev build-essential python-pip default-libmysqlclient-dev python-xmpp
Figura 4: Instalando dependencias para TIDoS en Kali Linux

Para continuar, descargamos TIDoS del repositorio de GitHub, ejecutando el siguiente comando:
git clone https://github.com/0xinfection/tidos-framework.git
A continuación, nos movemos al directorio de TIDoS y lo vamos a instalar. Para ello basta con ejecutar uno de sus ficheros:
chmod +x install; ./install
Se mostrará la siguiente pantalla, y al dar a la tecla Enter, empezará el proceso de la instalación. Pasado un rato no muy largo, tendremos que ver un mensaje por pantalla que nos diga que el proceso ha terminado: "Setup successful".

Figura 5: Instalando TIDoS en Kali Linux

Llegados al final de esta parte del proceso de la instalación,  ya está todo listo para empezar a probar el framework con aplicaciones web y ver qué se puede sacar de esta herramienta.

Haciendo uso de TIDoS

Ya podemos iniciar el framework. Para ello basta con poner tidos en una terminal y empezar a probarla. El uso es sencillo, cuenta con menús y números que tendremos que ir seleccionando, para testear las diferentes funcionalidades. Además tendremos que dar cierta información para que pueda realizar su trabajo correctamente configurando cada prueba.

Figura 6: Iniciando TIDoS y configurando el objetivo

El primer dato que introducir será el nombre de dominio FQDN o la dirección IP del objetivo. En nuestro caso es la dirección IP de una máquina de pruebas en la red local. Recuerda tener permisos o ser el propietario de la web a probar, no te metas en líos innecesarios por probar una herramienta. Eso sí, siempre puedes probar sitios Hacking Friendly.

Nada más iniciar, veremos menú inicial, que nos dará cinco opciones para comenzar a trabajar sobre nuestro objetivo, que son las siguientes que puedes ver a continuación:
  1. Reconnaissance & OSINT
  2. Scanning & Enumeration
  3. Vulnerability Analysis
  4. Explotiation (Beta)
  5. Auxiliary Modules
La opción de Exploitation se encuentra en fase beta y aún tiene que crecer, por lo que la obviaremos. El punto de los Auxiliary Modules tampoco se probará en esta primera toma de contacto. En este apartado se nos ofrecen opciones para generar hashes, hacer encodes de payloads o extraer metadatos de imágenes entre otras opciones.

La primera opción que vamos a elegir es hacer es un poco de Hacking con Buscadores usando Google que se encuentra en el punto 1 dentro de las opciones de OSINT. Ponemos el termino a buscar y limitamos el número de resultados (recomiendan no poner más de 30).

Figura 7: Buscando información sobre Chema Alonso

Existen muchas otras opciones, que te invito a investigar. Ahora pasamos al punto de Scanning & Enumeration, y probamos a usar un escáner de puertos del tipo Stealth, nos pide el rango de puertos y si queremos ponerlo en modo verbouse.

Figura 8: Configurando un scanner de puertos en modo stealth

Hace su función correctamente, aunque para estos casos sigo prefiriendo tirar de nmap como hace la gran mayoría de pentesters, que sus opciones son cuasi-infinitas. Pero siempre viene bien conocer alternativas. El resultado de esta prueba se muestra en la imagen siguiente.

Figura 9: Resultado del escaner en modo stealth

Toca pasar al punto de Vulnerability Analysis, y escanear en búsqueda de vulnerabilidades web en el objetivo. Dentro de la página Mutillidae II, proyecto de OWASP, se cuenta con un entorno con varias vulnerabilidades. Este objetivo nos puede servir como entorno perfecto de pruebas para ver cómo se comporta TIDoS.

Figura 10: Libro de Hacking Web Applications: Client-Side Attacks
(XSS, CSSP, SSRF, XSPA, SSJS) en 0xWord

En esta primera evaluación probamos la detección de los bugs de Clickjacking, dentro de los bugs básicos, y obtenemos el resultado que se ve en la imagen siguiente. Podemos guardar el código de la PoC que ha dado positivo en un fichero HTML.

Figura 11: Se ha detectado un código vulnerable a ClickJacking

Si pasamos a probar una de las vulnerabilidades críticas (XSS), para usar este módulo, tenemos que elegir entre dos modos, el automático o el manual, donde le pasamos la URL a probar.

Figura 12: Prueba de XSS manual positiva

Como se puede ver, al probar el payload se ha conseguido un valor positivo que habrá que probar en real a ver si es un falso positivo o de verdad es vulnerable - en este caso es vulnerable -.

PoC – Vídeo TIDoS

La mejor forma de conocer una herramienta es probarla, pero para abrir boca, otra opción que puede ayudar es ver un pequeño vídeo de la herramienta en acción. Aquí dejamos una pequeña PoC lanzando el módulo de XSS que acabamos de probar.

Figura 13: PoC: Prueba de XSS con TIDoS

Conclusión

TIDoS es una herramienta para tener en cuenta, y si te ánimas, ayudarla a crecer. Todavía tiene posibles mejoras, por ejemplo, a veces se queda pillada o entra en bucles infinitos y hay que tirar de CTRL+C y toca volver a empezar. Además, bajo mi punto de vista debería dar más información sobre los problemas que se va encontrando. Por ahora te regresa al menú y antes, durante un segundo ,muestra las excepciones, que se pueden ver en la imagen siguiente, por problemas de conectividad que se detectan con bloqueos de seguridad o fallos de red.

Figura 14: Error de conexión que se puede leer solo durante 1 segundo

Estaremos atentos a las actualizaciones, y seguiremos probando la herramienta, a ver si llegan mejoras y nuevas funcionalidades. Desde luego es un trabajo muy grande y hay que agradecer este tipo de proyectos y ayudarles a seguir creciendo, dando ideas, con críticas constructivas o haciendo Pull Requests a los proyectos (aunque éste actualmente no acepta). Desde aquí quiero felicitar a 0xInfection por dar vida a TIDoS.

¡Hasta la próxima!

Autor: Josué Encinar García (@JosueEncinar), autor del blog BoomerNiX y Security Researcher en  ElevenPaths y en el equipo de Ideas Locas de la unidad CDO de Telefónica.

Fortinet FortiGuard Blog: Quick Analysis of New Method for Spreading TrickBot

$
0
0
Recently, FortiGuard Labs captured a suspicious email. After an analysis, we discovered that it was spreading the malware TrickBot. Read to learn more.

Zero in a bit: Docker Hub Database Breached, As Many As 190,000 Accounts Affected

$
0
0
Veracode Container Security Docker Breach April 2019

Docker, a company that created an open platform for building and running distributed applications, reported to users that its Docker Hub database had been breached, exposing sensitive data from approximately 190,000 accounts. While that figure makes up less than five percent of Hub users, the data included some usernames and hashed passwords as well as Github and Bitbucket tokens for Docker autobuild. The company reported that the tokens have been revoked, and said it “acted quickly to intervene and secure the site.”

Experts who spoke with Motherboard indicated that the worst-case scenario is that hackers gain access to proprietary source code of some of those accounts. For context, companies on Docker’s roster include the likes of Paypal and Visa. Microsoft quickly reported that its official files hosted in Docker Hub were not compromised.

According to Veracode CTO Chris Wysopal, it is not yet known what the underlying vulnerability was at Docker Hub, but it is a serious breach as attackers could use the access tokens to get at a company’s source code. It is unclear if the attackers would have write privileges, which would enable backdooring into the code. Wysopal said each customer that was notified should be resetting access tokens and looking at logs for access. With revision control, this is all heavily audited.

Since Docker notified customers quickly, hopefully the impact is limited. The company emailed those impacted by the breach directly with a password reset link. Customers using autobuilds should check to ensure that their GitHub or Bitbucket repositories are still linked to the Docker Hub to ensure autobuilds work correctly moving forward.

Thousands of companies and millions of developers around the world use Docker to run containers, which are software packages that include code, runtime, settings, system libraries, and system tools. By isolating software from its surroundings, software containers enable code to always run the same regardless of the environment it is operating within. Although the company is still investigating the breach, if hackers have access to the private code in the repositories, they may be able to inject malicious code into software autobuilt by Docker.

Wired: Security: The Battle of Winterfell: A Tactical Analysis

$
0
0
If you're going up against an army of the undead, maybe plan a little better.
Viewing all 12054 articles
Browse latest View live